Difference between revisions of "Install Fusion Metadata Registry V11"
(→Overview) |
|||
| (15 intermediate revisions by 2 users not shown) | |||
| Line 1: | Line 1: | ||
| + | [[Category:Installation_and_Configuration]] | ||
| + | |||
[[Category:How_To V11]] | [[Category:How_To V11]] | ||
[[Category:How_To]] | [[Category:How_To]] | ||
| Line 12: | Line 14: | ||
The Install Wizard is a two-page wizard that is shown for the first time when an unconfigured Fusion Metadata Registry is started. This page is only shown once and once all the appropriate information has been collected, it will not be displayed again, even if you upgrade FMR to a later version 11. | The Install Wizard is a two-page wizard that is shown for the first time when an unconfigured Fusion Metadata Registry is started. This page is only shown once and once all the appropriate information has been collected, it will not be displayed again, even if you upgrade FMR to a later version 11. | ||
| − | If you do need to return to the install wizard for whatever reason, instructions can be found [[Return_to_Install_page here]] | + | If you do need to return to the install wizard for whatever reason, instructions can be found [[Return_to_Install_page | here]]. |
| − | + | = Step 1: Database Connection= | |
| + | On this step you need to provide the details of how to connect to your database service, the schema to use, and the database account credentials. The following types of database are supported: | ||
| − | + | * [[Install_SQL Server|SQL Server]] | |
| − | * | + | * [[Install_MySQL|MySQL]] |
| − | * | + | * [[Install_Oracle|Oracle]] |
| − | + | '''Note:''' Since version 11.4.0 of FMR, only the SQL Server connector is distributed within FMR itself. Please refer to the MySQL page or Oracle page for instructions on obtaining an appropriate connector. | |
| − | |||
[[File:Database Install Page V11.PNG||Database Page|thumbnail]] | [[File:Database Install Page V11.PNG||Database Page|thumbnail]] | ||
| − | |||
| − | |||
| − | |||
| − | |||
| − | |||
| − | |||
Clicking '''Apply Settings''' will test the connection to the database and automatically build all of the tables. | Clicking '''Apply Settings''' will test the connection to the database and automatically build all of the tables. | ||
| Line 40: | Line 36: | ||
Once you have entered these settings, you will see the Public License Agreement which you must accept in order to proceed to the next step. | Once you have entered these settings, you will see the Public License Agreement which you must accept in order to proceed to the next step. | ||
| − | =Server Settings= | + | =Step 2: Server Settings= |
| − | + | ||
| + | On this steps there are two required pieces of information that must be provided: the server url; the credntials for the root account. There is also the option to restore from a backup | ||
| + | |||
| + | ==Server URL== | ||
| + | The Server URL is the fully-qualified URL which the Fusion Registry will be access by, and is used by FMR when it needs to communicate the URL to a user, for example on the web service builder. | ||
| + | '''NOTE:''' It is very important that the Server URL is set to reflect the public URL that the FMR will be accessed by, as this will be used as the base URL for any redirects (such as login, logout). | ||
| + | |||
[[File:Server Settings Page V11.PNG|Server Settings Page|thumbnail]] | [[File:Server Settings Page V11.PNG|Server Settings Page|thumbnail]] | ||
| − | + | When running on a private machine, this value of Server URL can be set to | |
<nowiki>http://localhost:8080/FusionRegistry</nowiki>. | <nowiki>http://localhost:8080/FusionRegistry</nowiki>. | ||
| Line 52: | Line 54: | ||
<code>http://<hostname>:port/FusionRegistry</code> | <code>http://<hostname>:port/FusionRegistry</code> | ||
| − | + | == Root Credentials== | |
| − | + | FMR supports an external security mechanisms (such as Active Directory or LDAP) which can be set once the FMR has been installed, however a "local root" credential must be specified to complete installation. This is a single local account that can be used to access FMR at the highest privilege level of "root". It is typical for the root account to be named either <code>root</code> or <code>admin</code> | |
| + | <p> | ||
| + | After the install process, only the root user can modify the root user settings, so it is important that the credentials for this account are kept safe. | ||
| + | <p> | ||
| + | This step has settings for the root username, password and the maximum number of attempts that can be made to login as root before the account is locked. If this value is set to a zero or negative | ||
| + | number, this states there the account will never become locked from repeated failures to login. If the root user becomes locked, see the section on [[Return_to_Install_page | returning to the Install Wizard]] for the means to unlock it. | ||
| − | + | ==Restoring From Backup== | |
| + | Please refer to the section: [[Backup_and_Restore | Backup and Restore]]. | ||
Latest revision as of 04:03, 30 March 2024
Contents
Pre-requisites
To successfully install FMR you need ensure that the previous steps have been followed:
- Install a Java Runtime Environment More
- Install and configure an Apache Tomcat web application server More
- Deploy the Fusion Metadata Registry software to the web application server More
Overview
The Install Wizard is a two-page wizard that is shown for the first time when an unconfigured Fusion Metadata Registry is started. This page is only shown once and once all the appropriate information has been collected, it will not be displayed again, even if you upgrade FMR to a later version 11.
If you do need to return to the install wizard for whatever reason, instructions can be found here.
Step 1: Database Connection
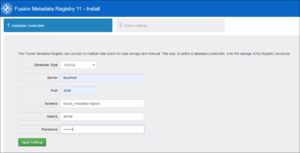
On this step you need to provide the details of how to connect to your database service, the schema to use, and the database account credentials. The following types of database are supported:
Note: Since version 11.4.0 of FMR, only the SQL Server connector is distributed within FMR itself. Please refer to the MySQL page or Oracle page for instructions on obtaining an appropriate connector.
Clicking Apply Settings will test the connection to the database and automatically build all of the tables.
Database Connection Troubleshooting
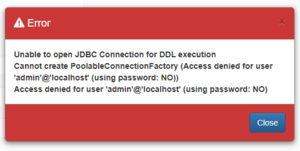
Any problems Fusion Registry encounters connecting to the database service will result in an error message. The example below indicates that the user credentials are wrong.
Once you have entered these settings, you will see the Public License Agreement which you must accept in order to proceed to the next step.
Step 2: Server Settings
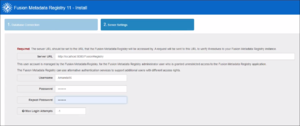
On this steps there are two required pieces of information that must be provided: the server url; the credntials for the root account. There is also the option to restore from a backup
Server URL
The Server URL is the fully-qualified URL which the Fusion Registry will be access by, and is used by FMR when it needs to communicate the URL to a user, for example on the web service builder. NOTE: It is very important that the Server URL is set to reflect the public URL that the FMR will be accessed by, as this will be used as the base URL for any redirects (such as login, logout).
When running on a private machine, this value of Server URL can be set to
http://localhost:8080/FusionRegistry.
If running on a server and will be used by multiple people, then the Server URL will be
http://<hostname>:port/FusionRegistry
Root Credentials
FMR supports an external security mechanisms (such as Active Directory or LDAP) which can be set once the FMR has been installed, however a "local root" credential must be specified to complete installation. This is a single local account that can be used to access FMR at the highest privilege level of "root". It is typical for the root account to be named either root or admin
After the install process, only the root user can modify the root user settings, so it is important that the credentials for this account are kept safe.
This step has settings for the root username, password and the maximum number of attempts that can be made to login as root before the account is locked. If this value is set to a zero or negative number, this states there the account will never become locked from repeated failures to login. If the root user becomes locked, see the section on returning to the Install Wizard for the means to unlock it.
Restoring From Backup
Please refer to the section: Backup and Restore.


