Difference between revisions of "Active Directory - Role Mapping"
(→Adding an Administrator) |
|||
| (2 intermediate revisions by the same user not shown) | |||
| Line 1: | Line 1: | ||
| + | [[Category:Installation_and_Configuration]] | ||
[[Category:FMR_Configuration_Reference]] | [[Category:FMR_Configuration_Reference]] | ||
| + | [[Category:RegistrySecurity]] | ||
==Overview== | ==Overview== | ||
The Role Mapping function is available to logged-in users and found on on the Security Settings menu. | The Role Mapping function is available to logged-in users and found on on the Security Settings menu. | ||
Latest revision as of 03:18, 26 March 2024
Contents
Overview
The Role Mapping function is available to logged-in users and found on on the Security Settings menu.
Role Mapping links Organisations (Agencies, Data Providers and Data Consumers) and Administrators to an Active Directory implementation.
Setting up Role Mappings
Please refer to this article.
Editing a Mapping
To change a Role Mapping, click the relevant option to open the Role Mapping modal which will display the name of the Group in Active Directory and the Organisations in the Registry that have been mapped to the Group.
To add another Organisation to the AD Group, select it so a tick appears in the relevant box.
To remove an Organisation, simply untick.
To remove the whole group from the Role Mapping page, make sure that no ticks are present and when you return to the Role Mapping page you will find that any Organisation previously applied to the Group will no longer appear.
Once you have finished editing, click Assign to return to the Role Mapping page.
Delete all Mappings
This can be achieved by using the tool as shown below.
Export Mapping to a CSV file
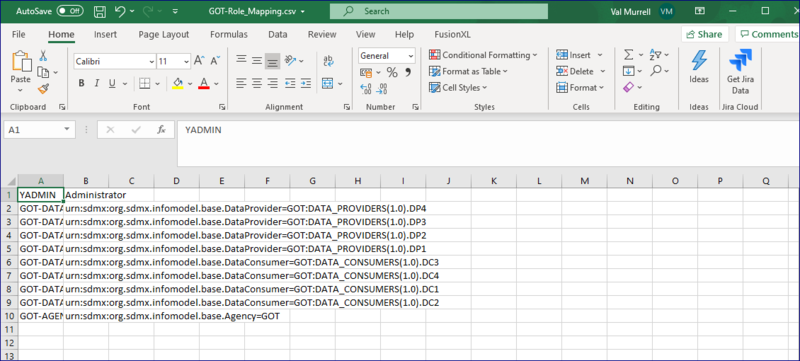
This option allows you to export an excel CSV file, How this file appears will depend on what you use to open it with.
Opened with Excel
Opened with Notepad
Import Mapping from a CSV file
Not using a previously exported CSV file
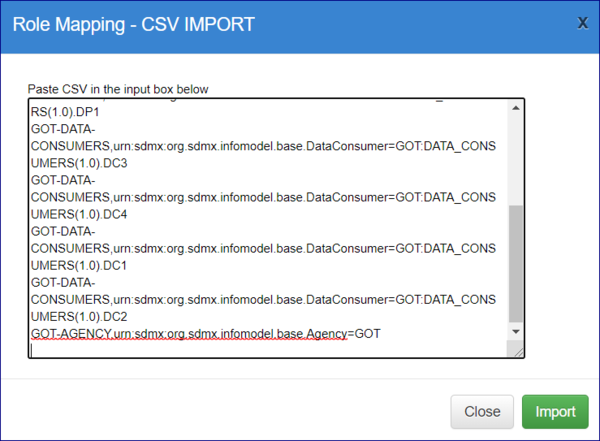
This option allows you to paste in text as shown in the example below.
Provided that the text is correctly entered, the role mappings will be created for you once the Import button is clicked.
In this example:
- There is an Administrator which is in the AD Group YADMIN.
- The Agency ID in the Registry is GOT.
- The Agency has 4 Data Providers (DP1 - DP4) who are all members of the AD Group GOT-DATA-PROVIDERS
- The Agency has 4 Data Consumers (DPC - DC4) who are all members of the AD Group GOT-DATA-CONSUMERS
A comma is needed between the AD Group and the text (for example) urn:sdmx:org.sdmx.infomodel.base.DataProvider=GOT:DATA_PROVIDERS(1.0)
In this example the text to enter would be as shown below (with additional lines for DC2 - DC4 and DP2 - DP4).
- Admin User: YADMIN,Administrator
- Agency: GOT-AGENCY,urn:sdmx:org.sdmx.infomodel.base.Agency=GOT
- Data Provider: GOT-DATA-PROVIDERS,urn:sdmx:org.sdmx.infomodel.base.DataProvider=GOT:DATA_PROVIDERS(1.0).DP1
- Data Consumer: GOT-DATA-CONSUMERS,urn:sdmx:org.sdmx.infomodel.base.DataConsumer=GOT:DATA_CONSUMERS(1.0).DC1
Using a previously exported CSV file
You will need to manipulate the files exported via the Role Mapping page.
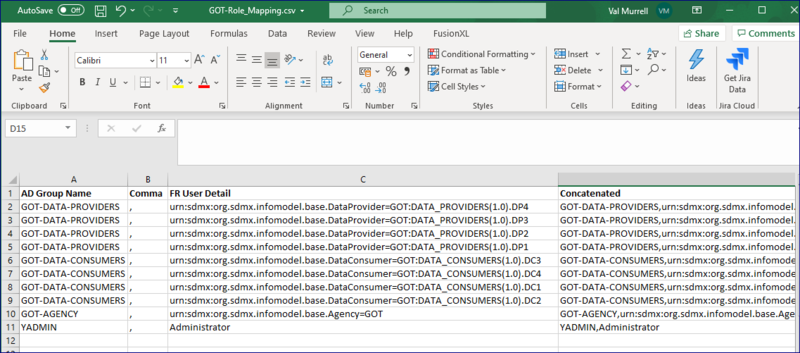
Example 1
In this example, I have opened the CSV file using Excel and have used the concatenate function to create a file in the correct format. The column "Concatenated" is the copied and pasted into the import box.
Example 2
In this example I have opened the CSV file using Notepad and used find and replace to remove the " characters.
Adding an Administrator
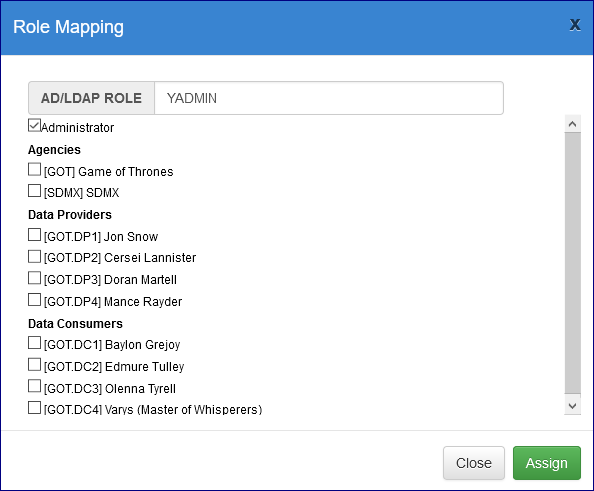
If you wish to add an Administrator, enter the Name of the AD Group and tick the box Administrator as shown below.
Template Mappings
If no Role Mappings are defined, the Registry will communicate to Active Directory using a Role Template. In this scenario, users are given permission by assigning them to groups and the names of the groups follows a specific pattern to provide authorisation.
To set up roles permitting Agency level authorisation, groups for the appropriate agency must be named “ACY_” and then be followed by the agency name. E.g. A group which permits users assigned to that group to modify SDMX structures, must be named “ACY_SDMX”.
To create a group that permits Administrator access to the Registry, the group needs to be named “Administrators” (this is not case sensitive).


