Difference between revisions of "FusionXL install"
| Line 33: | Line 33: | ||
After clicking OK, restart Excel to see the RXL tab as shown in the image above. | After clicking OK, restart Excel to see the RXL tab as shown in the image above. | ||
| + | |||
| + | You are now ready to connect FXL to your Registry. | ||
Revision as of 10:51, 13 April 2021
Overview
FusionXL is an Excel add-in which is available to download from ? (e-mail to Glenn 13.04).
It consists of a single XLAM file which should be saved to your computer in one of two specific places (not both). It will work with Microsoft Excel 2010 and later.
The XLAM file must be located in an AppData folder in one of two possible locations and the next time Excel is started, you will see a tab as shown on the image below.
To add FXL to Windows 10 or higher, follow one of the two steps below.
Using XLSSTART folder
Place the XLAM file in the Excel sub directory folder XLSTART as shown in the example path below:
C:\Users\[your user name]\AppData\Roaming\Microsoft\Excel\XLSTART
Using the Addins sub directory folder
Place the XLAM file in the Excel sub directory folder XLSTART as shown in the example path below:
C:\Users\[your user name]\AppData\Roaming\Microsoft\AddIns
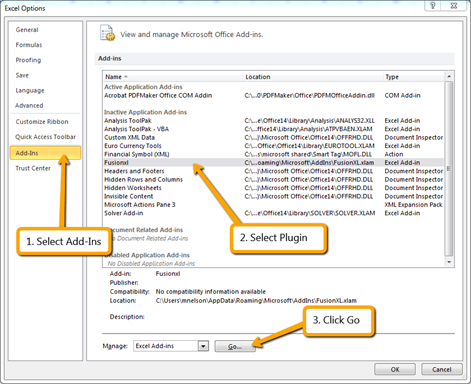
Having done this, the next step is to enable the Add-in. In Excel select the Options menu and then Add-ins.
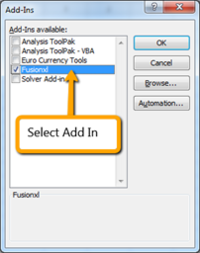
After clicking Go an Add-Ins window will be displayed which will show FusionXL as an available add-in. Select this add-in and click OK.
After clicking OK, restart Excel to see the RXL tab as shown in the image above.
You are now ready to connect FXL to your Registry.


