Connect FXL to a Registry
Having saved the XLM file as detailed in the Set Up article, the first step is to set up a connection to a Registry.
This is achieved by clicking the Setup Connections button.
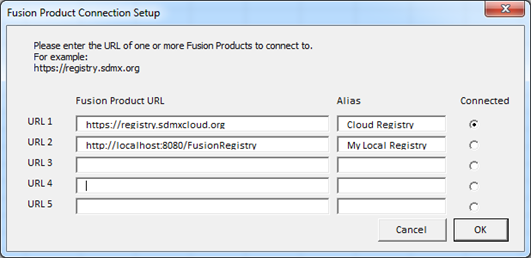
A dialog will be displayed as shown on the image below, allowing the entry of up to 5 distinct URLs. Each URL should reference a valid Registry instance, and have a unique alias.
On clicking OK, the selected connection will be verified, and the dialog will be closed.
Having Setup the connection, you will see it displayed in the image below. You can also Login from here.
You can change the Registry (provided it has been set up) by clicking the chevron below the Registry Alias.
Another drop-down allows the user to switch between “Structure Explorer” and “Data Explorer”.
Login
The login control allows the user to login to the specified Registry if they have the correct credentials. A non-logged in user is able to view the contents of the Registry, but a user must be logged in if they wish to modify structures in the Structure Explorer.


