Install MySQL
Contents
Overview
MySQL may be used to act as the persistant store for Registry information. However the JDBC driver that communicates from the Registry to a MySQL instance is not provided within FMR (since FMR version 11.4.0) and must be obtained by a Systems Administrator.
It is also permitted to use a MySQL equivalent service like MariaDB. It must be MySQL 5.7 compatible.
Installing MySQL 5.7
It is beyond the scope of this article to explain how to install MySQL, but at the current time of writing the community edition of MySQL Server may be downloaded for free.
The MySQL instance must be accessible to the FMR and FMR will need an database account that can create, update and modify tables.
Obtaining and Specifying the MySQL JDBC Driver
To get FMR to communicate succesfully with a MySQL database, there are three tasks to perform:
- Obtain the correct dependency file
- Supply this to your Java Web Server (e.g. Tomcat) that you are using to run FMR.
- Specify the appropriate Credentials to FMR.
Obtaining the MySQL Connector Dependency
The ‘jar’ file is not included as part of the FMR distribution so must be obtained and installed separately prior to starting the application.
Driver Installation
There are a number of ways that the JAR file can be supplied to your Web Server and these ways will depend on the Web Server you are using. We recommend the use of Apache Tomcat since it is quick and easy to configure.
For Apache Tomcat, the jar file can be added to the "lib" folder of the Tomcat instance. The jar could also be added to the WEB-INF\lib folder of FMR once FMR has been expanded under the "webapps" directory (this method is not recommended as the file is lost when the Registry is upgraded). Another method is to specify the jar via the "setenv" file which allows the setting of environment variables at Tomcat launch-time.
Specifying via setenv
setenv.bat (or setenv.sh for UNIX) is located in the Tomcat's bin folder. If the file does not exist simply create it.
In setenv, add the location of the mysql-connector jar file to the CLASSPATH. This can be achieved by use of the following line (which uses a location from the example above):
set CLASSPATH=C:\SQL_Connector\mysql-connector-java-8.0.30\mysql-connector-java-8.0.30.jar
Connection Details
FMR requires a database to be specified on the first page of the Install Wizard. This can be changed at a later from the Administrator "Database Settings" page.
Oracle by default uses port 1521.
If you wish to make a custom connection to Oracle, the information you will likely need is:
| Connection String | Of the form:
jdbc:oracle:thin:@server url>:<server port>/<oracle schema>
|
|---|---|
| Dialect | org.hibernate.dialect.Oracle10gDialect |
| Class Name | oracle.jdbc.driver.OracleDriver |
Using FMR 11.4 or later versions
As from Verion 11.4, if you are using MySQL you will need to obtain the MySQL connector as discussed in this article.
Having obtained the connecter you will need to make a change to the fine sertenv.bat as detailed in this article.
Creating the Fusion Metadata Registry schema
We recommend that you create a dedicated schema for Fusion Metadata Registry to use. You can do that using the mysqlsh command line interface, but a simple option is to install the MySQL Workbench which provides a graphical user interface for Windows users.
MySQL Workbench GUI
Download and install MySQL Workbench.
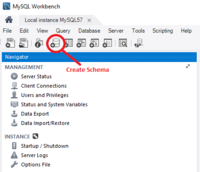
Using MySQL Workbench, connect to your MySQL database service and create a new schema. There's a button on the toolbar to do that.
It's usual to give the schema a name like fusion_metsdata_registry, but there's no restrictions so call it what you like. You'll tell Fusion Metadata Registry the name of the schema to use during the install process.
New Installations of FMR
If you are implementing a new installation of Fusion Metadata Registry, having installed MySQL the next step is to to complete the installation process More.
