Difference between revisions of "Data Structure Definitions V11"
(→Step 3 - Dimension Position and Content) |
|||
| Line 27: | Line 27: | ||
The allowable content can be enumerated (which is a reference to a Codelist) or non-enumerated (for example Text, Integer, Double, Boolean etc). The allowable content defines what data a user can report when they are supplying a dataset. | The allowable content can be enumerated (which is a reference to a Codelist) or non-enumerated (for example Text, Integer, Double, Boolean etc). The allowable content defines what data a user can report when they are supplying a dataset. | ||
| + | |||
| + | You can also make the Component mandatory by placing a tick in the Required check box. | ||
==Step 4 - Attributes== | ==Step 4 - Attributes== | ||
Revision as of 05:33, 28 March 2024
Contents
Overview
A Data Structure Definition (DSD) defines a dataset in terms of its Dimensionality and allowable content. All reported datasets must conform to the definition defined by the DSD.
A DSD Consists of Dimensions, Attributes, and Measures, collectively these are termed Components. Each Component of a DSD references a Concept to provide a semantic meaning, and optionally a Codelist to provide an enumerated list of allowable content for reported data.
Wizard
From the Data menu, select the Data Structure Page and use the maintenance button to create a Data Structure. ![]()
Step 1 - High Level Details
The steps in a DSD Wizard includes step 1 which provides the generic, high level details about the Data Structure Definition. See this article for more information on authoring and maintaining structures.
Step 2 - Concepts
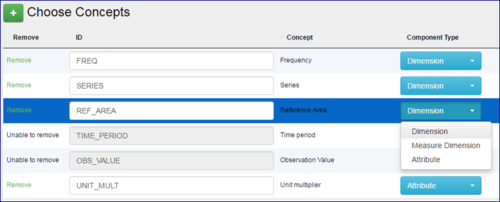
The second step of the Wizard allows the user to define all the other Concepts which will be used by the DSD. Each Concept can be assigned a role of Dimension, Measure Dimension, or Attribute.
Step 3 - Dimension Position and Content
The third step of the wizard allows the user to define the allowable content for each Component. If the Concept has a default Representation this will be selected by default, however this Representation can be changed if required.
The allowable content can be enumerated (which is a reference to a Codelist) or non-enumerated (for example Text, Integer, Double, Boolean etc). The allowable content defines what data a user can report when they are supplying a dataset.
You can also make the Component mandatory by placing a tick in the Required check box.
Step 4 - Attributes
The final step of the Wizard is to define the assignment status (required or optional) and attachment level (dataset, series, dimension group, observation, group) of Attributes as shown in the screenshot below.
The purpose of each attachment levels is described below.
Dataset Attachment
An Attribute attaching to a dataset will mean that when data is reported for the dataset, there will be a single value which is provided for the dataset. For example, the Unit of Measure Attribute could be attached to the dataset if it is expected that all the observations will always be measured using the same unit.
Series Attachment
If the Attribute attaches to a Series, then the Attribute will attach itself to every Dimension in the Data Structure Definition, except the Time Dimension. This attachment is used to define that the value for the Attribute can vary for each Series in the dataset. For example, the Series Title Attribute could attach to a Series, as each series will have a different title.
It is possible to modify this attachment to specify a subset of the Dimensions, if the value for the attribute only relates to a subset.
Observation Attachment
If a value for an Attribute can change from Observation to Observation, then the attachment level should be set to Observation. An example of an Observation attachment is Observation Confidentiality.
Group Attachment
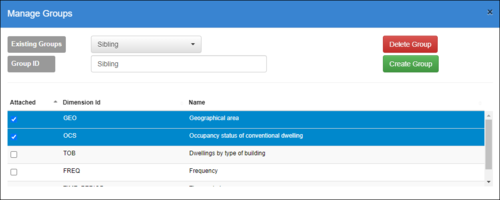
The final attachment is to a pre-defined Group of Dimensions. This is similar to Series Attachment, in that the Attribute will attach to a subset of Dimensions, however the subset is defined by the referenced Group.
This option is only available in the list if a Group has been defined. To define, modify, or delete a Group, click on the ‘Manage Groups’ button, which will open a window, as shown below.


