Difference between revisions of "Hierarchal Codelists"
(→Step 3 - Build Hierarchy) |
(→Step 2 - Codelists and Hierarchy) |
||
| Line 24: | Line 24: | ||
In the lower area ('''Hierarchies'''), you can specify what is to be created. Enter a Name and an ID together with an optional decsription if required. | In the lower area ('''Hierarchies'''), you can specify what is to be created. Enter a Name and an ID together with an optional decsription if required. | ||
| − | Note that organisations wishing to be compliant with accepted models for statistical classifications should ensure that the Id is the number associated with the Level, where Levels are numbered consecutively starting with level 1 at the highest Level | + | Note that organisations wishing to be compliant with accepted models for statistical classifications should ensure that the Id is the number associated with the Level, where Levels are numbered consecutively starting with level 1 at the highest Level. |
Revision as of 08:11, 22 February 2021
Contents
Overview
A Hierarchical Codelist provides a hierarchical view over one or more ‘standard’ Codelists. A Hierarchical Codelist can be thought of in the same way as a database view: it does not define any new codes, it is used to group any number of existing Codes from any number of existing Codelists. See this article for more information on authoring and maintaining structures.
Wizard
From the Items menu, select the Hierarchal Codelist Page and use the maintenance button to create a Hierarchal Codelist. ![]()
Step 1 - High Level Details
The steps in a Hierarchical Codelist Wizard includes step 1 which provides the generic, high level details about the Hierarchal Codelist. See this article for more information on authoring and maintaining structures.
Step 2 - Codelists and Hierarchy
The second step requires information on the Codelists that will be required when building the Hierarchies.
In the first part of the screen, click Add and select the Codelists that you intend to use (Referenced Codelists).
In the lower area (Hierarchies), you can specify what is to be created. Enter a Name and an ID together with an optional decsription if required.
Note that organisations wishing to be compliant with accepted models for statistical classifications should ensure that the Id is the number associated with the Level, where Levels are numbered consecutively starting with level 1 at the highest Level.
Step 3 - Build Hierarchy
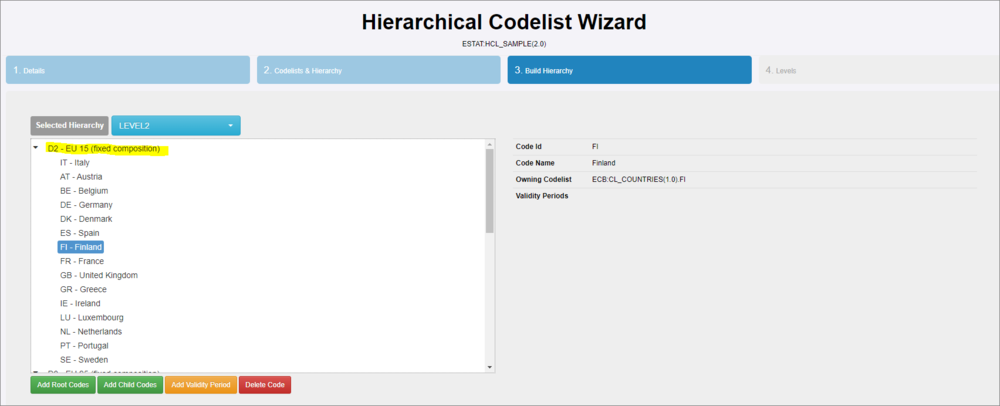
Step 3 enables you to add Root Codes (the Parent) and Child Codes for each of the hierarchies created in Step 2.
The Hierarchy selection box will display the IDs entered in Step 2. Select the appropriate Reference Codelist (as added in Step 2) and then the individual code.
The example below shown that a root code has been added for LEVEL2.
The next step is to add the Child codes.
First, highlight the Root Code and then click Add Child Codes. Next select the Referenced Codelist, and then the individual codes.
Once you have added the codes, you will be returned to Step 3 as shown in the example above.
To change the order of the codes, you can use drag and drop to reposition.
Step 4 - Levels
Step 4 of the wizard allows the user to provide a formal definition for each level of the hierarchy as shown in the example below.


