Difference between revisions of "Category Schemes and Categorisations"
| Line 1: | Line 1: | ||
| − | [[Category: | + | [[Category:Authoring_and_maintaining_structures_using_the_FRM_UI]] |
| − | + | =Overview= | |
Category Schemes are the container for one or more Categories. Categories can be built into a hierarchy. A Category is used to provide the means to categorise any other structure type, this creates a link between the Category and the target structure. | Category Schemes are the container for one or more Categories. Categories can be built into a hierarchy. A Category is used to provide the means to categorise any other structure type, this creates a link between the Category and the target structure. | ||
| − | + | A Categorisation is an independently maintained structure, which can be used to satisfy any use case where a structure requires a high level grouping. A typical use case for data dissemination is to link a Dataflow to one or more Categories using Categorisations. This use case allows a user to find Dataflows by Category. | |
| − | |||
[[File:CAT1.PNG|800px]]<br> | [[File:CAT1.PNG|800px]]<br> | ||
| − | == | + | =Wizard= |
| + | |||
| + | ==Step 1== | ||
| + | The steps in a Category Scheme Wizard includes step 1 which provides the generic, high level details about the Category Scheme. See this article [https://fmrwiki.sdmxcloud.org/All_Structures_-_FMR for more information on authoring and maintaining structures.] | ||
| − | + | ==Step 2== | |
| − | |||
The second step allows the user to import Categories from CSV. | The second step allows the user to import Categories from CSV. | ||
| Line 31: | Line 32: | ||
| − | If valid, Categories are created and added to the Category Scheme, shown in step 3. The third step is to manually add, edit, delete, Categories. Additionally this step can be used to organise Category position in the Category hierarchy, this is achieved using the drag and drop support on the Category in the tree. | + | If valid, Categories are created and added to the Category Scheme, shown in step 3. |
| + | |||
| + | ==Step 3== | ||
| + | |||
| + | The third step is to manually add, edit, delete, Categories. Additionally this step can be used to organise Category position in the Category hierarchy, this is achieved using the drag and drop support on the Category in the tree. | ||
[[File:CAT3.PNG|800px]]<br> | [[File:CAT3.PNG|800px]]<br> | ||
| − | + | =Categorising Structures= | |
| − | |||
A Categorisation is used to create a link between a Category and any other structure in the Registry. | A Categorisation is used to create a link between a Category and any other structure in the Registry. | ||
To create a Categorisation, first select a Category Scheme from the Category Schemes page, and then click View Category Scheme. | To create a Categorisation, first select a Category Scheme from the Category Schemes page, and then click View Category Scheme. | ||
| + | |||
[[File:CAT4.PNG|800px]]<br> | [[File:CAT4.PNG|800px]]<br> | ||
From the Category Scheme view, select the Category to link the structure to, and click '''Create''' '''Categorisation''', as highlighted in the image below. | From the Category Scheme view, select the Category to link the structure to, and click '''Create''' '''Categorisation''', as highlighted in the image below. | ||
| + | |||
[[File:CAT5.PNG|800px]]<br> | [[File:CAT5.PNG|800px]]<br> | ||
The final step is to choose which structures to Categorise. First select which Agency will own the Categorisation, and then select the target structure type followed by the target structure(s). This is shown in the image below. | The final step is to choose which structures to Categorise. First select which Agency will own the Categorisation, and then select the target structure type followed by the target structure(s). This is shown in the image below. | ||
| + | |||
[[File:CAT6.PNG|800px]]<br> | [[File:CAT6.PNG|800px]]<br> | ||
The Category Scheme view includes the linked structures. The link can be deleted from this view for each individual structure, as shown below, or in bulk by clicking Delete Categorisations, which will open up a bulk delete window. | The Category Scheme view includes the linked structures. The link can be deleted from this view for each individual structure, as shown below, or in bulk by clicking Delete Categorisations, which will open up a bulk delete window. | ||
| + | |||
[[File:CAT7A.PNG|800px]]<br> | [[File:CAT7A.PNG|800px]]<br> | ||
| − | |||
| − | |||
| − | |||
| − | |||
| − | |||
Revision as of 03:12, 24 September 2020
Overview
Category Schemes are the container for one or more Categories. Categories can be built into a hierarchy. A Category is used to provide the means to categorise any other structure type, this creates a link between the Category and the target structure.
A Categorisation is an independently maintained structure, which can be used to satisfy any use case where a structure requires a high level grouping. A typical use case for data dissemination is to link a Dataflow to one or more Categories using Categorisations. This use case allows a user to find Dataflows by Category.
Wizard
Step 1
The steps in a Category Scheme Wizard includes step 1 which provides the generic, high level details about the Category Scheme. See this article for more information on authoring and maintaining structures.
Step 2
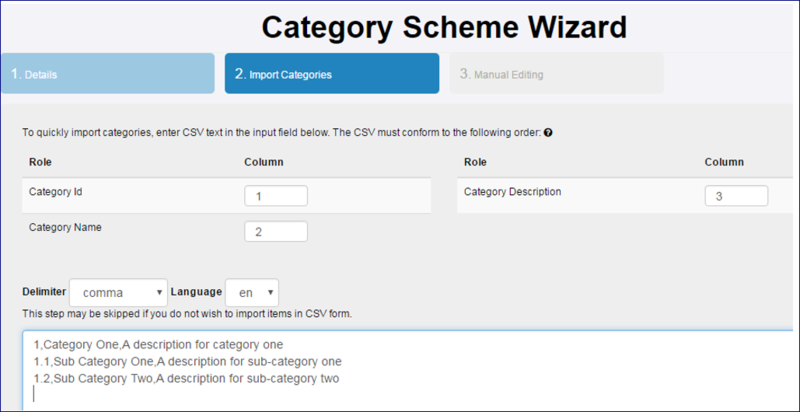
The second step allows the user to import Categories from CSV.
CSV text can be copied and pasted into the text field provided, and on clicking ‘Next’, the CSV is checked for correctness.
When Importing Categories via CSV it is important to note that the following:
- Categories will be added to the Category Scheme, and therefore this step can be used to add additional Categories to a Category Scheme which already has Categories.
- The import language for the name and description fields is defined in the drop down list above the text area.
- If a Category with the given Id already exists, it will be modified based on the information supplied in the CSV. Modifications include the addition of names or descriptions in a new language into an existing Category.
- Sub-Categories can be created by using the dot ‘.’ notation to include the ids of the parent Category(ies). This is shown in the image above where 1.1 is a sub-Category of Category 1.
- The same number of delimiters are required for each line, even if there is no information for the field, shown above where Frequency includes an additional comma followed by no text (there is no Parent Concept Id).
- If a field contains the delimiter (for example if a name includes a comma) then the text can be put in double quotes.
If valid, Categories are created and added to the Category Scheme, shown in step 3.
Step 3
The third step is to manually add, edit, delete, Categories. Additionally this step can be used to organise Category position in the Category hierarchy, this is achieved using the drag and drop support on the Category in the tree.
Categorising Structures
A Categorisation is used to create a link between a Category and any other structure in the Registry.
To create a Categorisation, first select a Category Scheme from the Category Schemes page, and then click View Category Scheme.
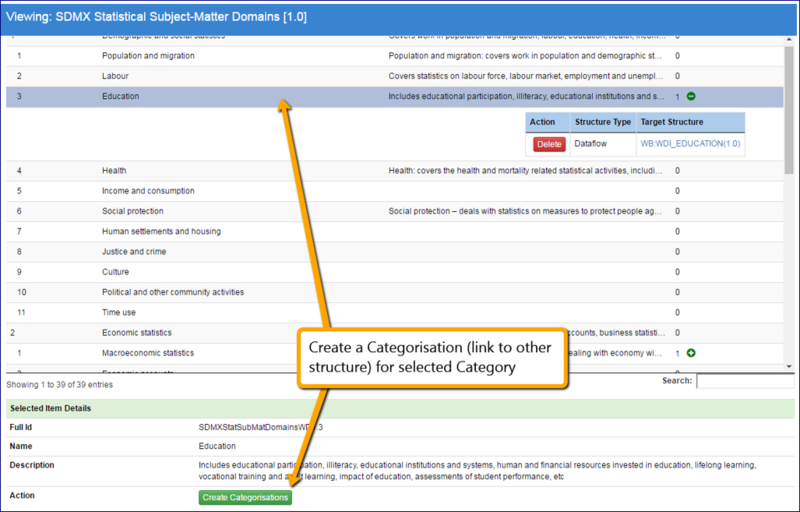
From the Category Scheme view, select the Category to link the structure to, and click Create Categorisation, as highlighted in the image below.
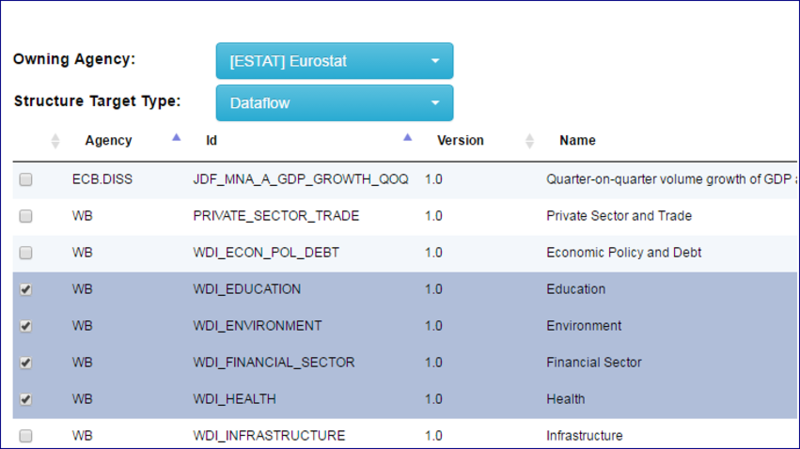
The final step is to choose which structures to Categorise. First select which Agency will own the Categorisation, and then select the target structure type followed by the target structure(s). This is shown in the image below.
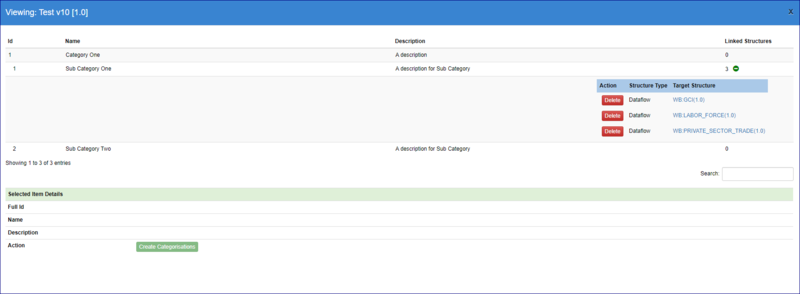
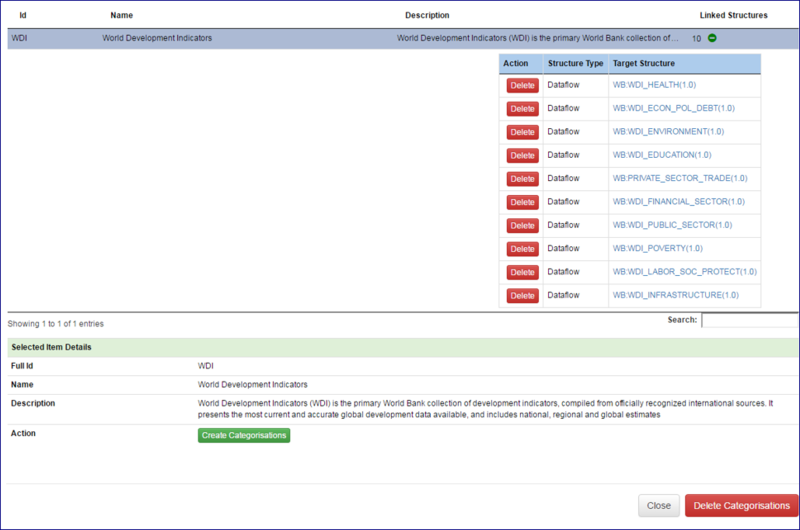
The Category Scheme view includes the linked structures. The link can be deleted from this view for each individual structure, as shown below, or in bulk by clicking Delete Categorisations, which will open up a bulk delete window.
