Difference between revisions of "Concepts Schemes and Concepts"
(Created page with "Category:FMR_Structures_Reference to be written.") |
|||
| (21 intermediate revisions by the same user not shown) | |||
| Line 1: | Line 1: | ||
| − | [[Category: | + | [[Category:Structural Metadata]] |
| + | [[Category:Structural Metadata V11]] | ||
| + | =Overview= | ||
| − | to be | + | Concept Schemes are a container for Concepts. Concepts are used by Dimensions, Attributes, Measures, and Metadata Attributes to provide them with a semantic meaning. Concepts can also be used to define a default representation, for example it is possible to link the Concept of Frequency to a Codelist containing all the Frequency Codes, any structure using the Concept will inherit the default representation. |
| + | |||
| + | See this article [https://fmrwiki.sdmxcloud.org/All_Structures for more information on authoring and maintaining structures.] | ||
| + | |||
| + | =Wizard= | ||
| + | |||
| + | ==Step 1 - High Level Details== | ||
| + | |||
| + | From the Items menu, select the Concepts Scheme Page and use the maintenance button to create a Concept Scheme. [[File :cogs.PNG|40px]]<br> | ||
| + | |||
| + | The steps in a Concept Scheme Wizard includes step 1 which provides the generic, high level details about the Concepty Scheme. See this article [https://fmrwiki.sdmxcloud.org/All_Structures for more information on authoring and maintaining structures.] | ||
| + | |||
| + | ==Step 2 - Import Concepts== | ||
| + | |||
| + | The second step allows the user to import Concepts from CSV. CSV text can be copied and pasted into the text field provided. On clicking '''Next''' Concepts will be created based on this CSV and added to the Concept Scheme. | ||
| + | |||
| + | |||
| + | [[File:CON3.PNG|Import Concepts|800px]]<br> | ||
| + | |||
| + | When importing Concepts it is important to note that the following: | ||
| + | |||
| + | # Concepts will be added to the Concept Scheme, and therefore this step can be used to add additional Concepts to an existing scheme. | ||
| + | # The import language for the name and description fields is defined in the drop-down list above the text area. | ||
| + | # If a Concept already exists it will be modified based on the information supplied in the CSV. Modifications include addition of a name or description in a new language into an existing Concept. | ||
| + | # Sub Concepts can be created by using parent Concept Id field. This is shown in the image above where SUB_CONCEPT is a sub-concept of REF_AREA. | ||
| + | # The same number of delimiters are required for each line, even if there is no information for the field, shown above where Frequency includes an additional comma followed by no text (there is no Parent Concept Id). | ||
| + | # If a field contains the delimiter (for example if a name includes a comma) then the text can be put in double quotes. | ||
| + | |||
| + | ==Step 3 - Manual Editing== | ||
| + | The third step is to manually add, edit, and delete Concepts. | ||
| + | |||
| + | |||
| + | [[File:CON4.PNG|Concepts - Step 3|800px]]<br> | ||
| + | |||
| + | Each Concept can be assigned a default representation. This representation is inherited by Components of a Data Structure Definition (DSD) as a default. Default representation can be overridden by each Component of the DSD if required. To apply a Representation to a Concept, select the Concept in the table, and click the Change Representation button. | ||
| + | |||
| + | |||
| + | [[File:CON7.PNG|Concepts - Change Representation|800px]]<br> | ||
| + | |||
| + | To link a concept to a codelist, select the concept and click the Change Representation button. All codelists will be displayed (if you have clicked the Enumerated button). Simply highlight the required codelist and then Save. Enumerated formats allow a Concept to be linked to a Codelist. The Codelist is used to define the enumerated list of all the allowable values for the Concept. | ||
| + | |||
| + | Representation formats can also be non-enumerated or enumerated. Non-enumerated formats refer to data formats which are restricted by data type as oppose to enumerated representation which provide a list of allowed values. Non-enumerated format includes types such as String, Integer, and Decimal, amongst others. Each non-enumerated format can optionally provide additional details relevant to the selected format, such as min/max length for String. | ||
| + | |||
| + | |||
| + | [[File:CON5.PNG|Data Type and Restriction|300px]]<br> | ||
| + | |||
| + | ==Step 4 - Build Hierarchy== | ||
| + | |||
| + | The final step of the Wizard allows the user to organise the Concepts into a Hierarchy using drag and drop. | ||
Latest revision as of 02:57, 22 August 2022
Contents
Overview
Concept Schemes are a container for Concepts. Concepts are used by Dimensions, Attributes, Measures, and Metadata Attributes to provide them with a semantic meaning. Concepts can also be used to define a default representation, for example it is possible to link the Concept of Frequency to a Codelist containing all the Frequency Codes, any structure using the Concept will inherit the default representation.
See this article for more information on authoring and maintaining structures.
Wizard
Step 1 - High Level Details
From the Items menu, select the Concepts Scheme Page and use the maintenance button to create a Concept Scheme. ![]()
The steps in a Concept Scheme Wizard includes step 1 which provides the generic, high level details about the Concepty Scheme. See this article for more information on authoring and maintaining structures.
Step 2 - Import Concepts
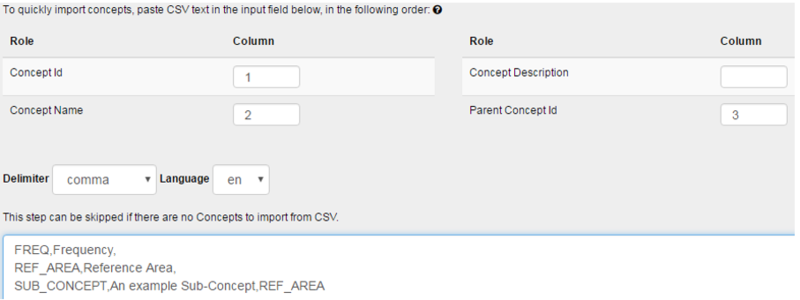
The second step allows the user to import Concepts from CSV. CSV text can be copied and pasted into the text field provided. On clicking Next Concepts will be created based on this CSV and added to the Concept Scheme.
When importing Concepts it is important to note that the following:
- Concepts will be added to the Concept Scheme, and therefore this step can be used to add additional Concepts to an existing scheme.
- The import language for the name and description fields is defined in the drop-down list above the text area.
- If a Concept already exists it will be modified based on the information supplied in the CSV. Modifications include addition of a name or description in a new language into an existing Concept.
- Sub Concepts can be created by using parent Concept Id field. This is shown in the image above where SUB_CONCEPT is a sub-concept of REF_AREA.
- The same number of delimiters are required for each line, even if there is no information for the field, shown above where Frequency includes an additional comma followed by no text (there is no Parent Concept Id).
- If a field contains the delimiter (for example if a name includes a comma) then the text can be put in double quotes.
Step 3 - Manual Editing
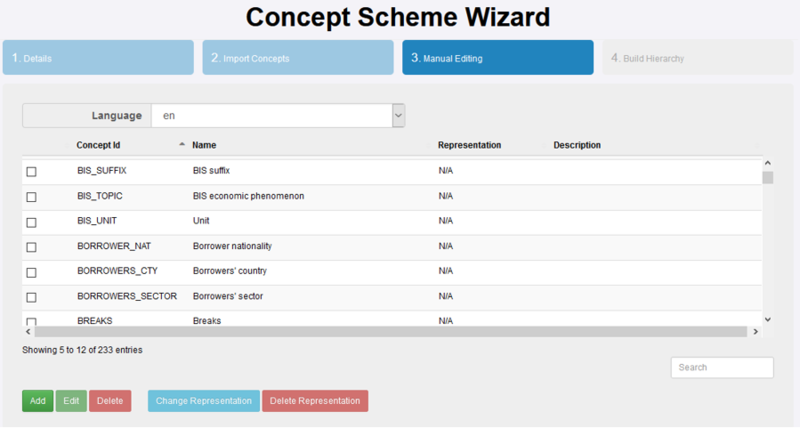
The third step is to manually add, edit, and delete Concepts.
Each Concept can be assigned a default representation. This representation is inherited by Components of a Data Structure Definition (DSD) as a default. Default representation can be overridden by each Component of the DSD if required. To apply a Representation to a Concept, select the Concept in the table, and click the Change Representation button.
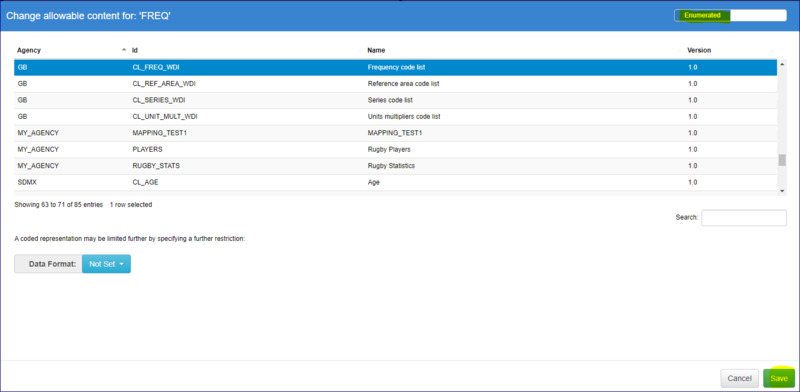
To link a concept to a codelist, select the concept and click the Change Representation button. All codelists will be displayed (if you have clicked the Enumerated button). Simply highlight the required codelist and then Save. Enumerated formats allow a Concept to be linked to a Codelist. The Codelist is used to define the enumerated list of all the allowable values for the Concept.
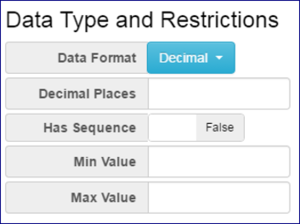
Representation formats can also be non-enumerated or enumerated. Non-enumerated formats refer to data formats which are restricted by data type as oppose to enumerated representation which provide a list of allowed values. Non-enumerated format includes types such as String, Integer, and Decimal, amongst others. Each non-enumerated format can optionally provide additional details relevant to the selected format, such as min/max length for String.
Step 4 - Build Hierarchy
The final step of the Wizard allows the user to organise the Concepts into a Hierarchy using drag and drop.


